The question of where to mount a red dot on an AR-15 is so simple that it seems, at first glance, to be almost rhetorical. It’s tempting to just answer, “On the top, obviously,” and go about your day.
And yet, improperly mounted red dots abound. They’re all mounted to the top of the rifle—or most of them, anyway—but that doesn’t always mean they’re mounted properly, and certainly not in the ideal position. Part of this is due to their popularity; as one of the most popular and easiest AR-15 upgrades, they have more opportunities to be incorrectly mounted.
Nearly anywhere you can find AR-15s, you will find improperly mounted red dots, and the reason is obvious. The question of where to mount your dot is so simple that it never occurs to many people to bother to seek out the answer—but there is a definite answer.

Where to Mount Your Red Dot (And Why It Matters)
Mounting position matters, just as much as other variables like sight height or mount selection. It can affect reliability, parts compatibility, field of view, and even reticle function. A properly mounted red dot aids the user in quickly and effectively acquiring a sight picture, making the process of engaging targets fast and efficient; an improperl mounted red dot forces the user to struggle against it, although it’s rare that a mounting location could be so bad as to completely prevent the rifle from being used effectively.
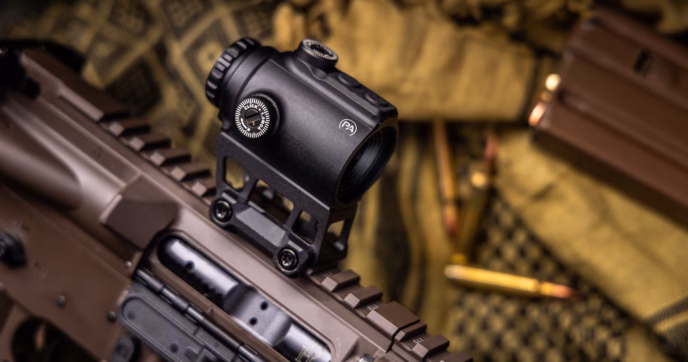
First and foremost, your red dot should be mounted to the top Picatinny rail of your receiver or handguard. Even when using an offset red dot mount, there is nearly no reason to attach your red dot to the side rails, even if your rifle has 45-degree MLOK or KeyMod slots.
The vast majority of mounts, both typical inline-mounted and offset, are designed to be used with the top rail of the firearm; attaching them to any other location can alter the angle at which they hold the sight relative to the barrel, which can, in turn, affect the zeroing process and drop compensation. This drawback comes with no attendant benefits, so there is nothing to be gained by mounting your dot to a side rail.
Beyond this basic principle, though, the best practices for mounting standard and offset red dots differ, so we’ll handle them separately from here on.

Standard Red Dots
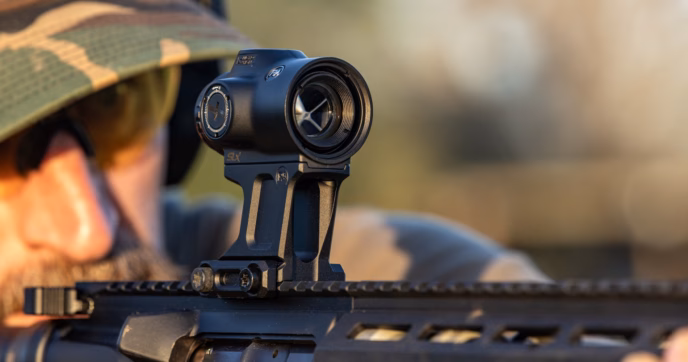
Standard, inline red dots mounted directly over the top rail are the most straightforward to install because they offer the least variation in proper mounting position.
The best place to mount this type of dot is on the top rail of the receiver, as far forward as you possibly can. Note, this does not mean that the dot should be mounted as far forward as possible on the rifle—only on the receiver. While a small amount of overlap onto the handguard or the gap between the receiver and the handguard is acceptable, no bolt or locking lug should be in contact with the handguard.
The reason that the red dot should be mounted entirely on the receiver, and not on the handguard, is that the handguard is an inherently weaker platform than the receiver. The top rail of the receiver is a machined part of it, whereas even the strongest handguards rely on screws, barrel nuts, wedges, or other simple machines that are significantly more likely to fail than forged aluminum.
Even if the handguard does not fail, handguards are almost invariably less rigid than receivers, which translates into a less consistent zero. Handguards, even free-floated ones, can shift under pressure as well, which would then affect the zero of your dot if it were mounted to the handguard.
The sole exception to this rule comes in the case of monolithic receivers, such as may be found on LMT’s MARS series of rifles. With this design, the “handguard” is an integral part of the receiver, machined directly out of the same block of aluminum. In this case, the generally accepted practice is to mount it roughly where the end of the top rail would be located on a standard AR-15 receiver, although the increased rigidity of the continuous top rail does offer more flexibility should you need it a bit further up.
The reason red dots are mounted as far forward as possible is to maximize the benefits of a red dot sight. If you’re mounting a red dot on your rifle, you chose it over other sighting options, such as iron sights or a magnified scope, for a reason.
The most common reason is the unlimited eye relief and field of view offered by a red dot. Red dots allow for both-eyes-open target engagement that doesn’t limit your field of view the way other optics can; however, some portion of your vision is inevitably obscured by the housing of the optic itself.
This is unavoidable, but by mounting the dot as far forward as possible, the issue is minimized. The farther away the housing is from your eye, the smaller the percentage of your field of view it occupies and obscures. Since red dots offer unlimited eye relief, there is effectively no drawback to mounting your dot as far forward as possible.
Additionally, mounting your red dot as far forward as possible is frequently a prerequisite for attaching accessories such as magnifiers or rear backup iron sights. While these accessories may not require you to mount your dot all the way forward, you’ll rarely find room for them if your red dot isn’t at least mounted on the front half of your receiver.

Offset Red Dots
Offset dots present a more complex problem. They’re subject to the same basic principles as inline dots—unlimited eye relief and a housing that benefits the user best by being as distant from the eye as possible—but they also have several other considerations.
Chief among them is that unlike inline-mounted red dots, offset dots are generally not the primary optic, and thus typically cede ideal mounting location. For instance, if you have a low-power variable optic mounted to your rifle, the bulk of the receiver may be occupied by a cantilever mount, leaving little space left for an offset dot, unless it can piggyback off of your scope mount, as is the case with options like the Unity F.A.S.T. mount.
Often, the primary optic will most or all of the rail space at the front of the receiver, leaving two main options for mounting an offset red dot: the rear of the receiver, or the handguard.
The rear of the receiver offers the most secure mounting position, unless, of course, you are utilizing a monolithic upper. However, mounting your offset dot to this position will cause the housing to obscure more of your vision, on account of its closer proximity to your eye. Some users may also find the dot more difficult to acquire when transitioning from their main optic.
Mounting to the handguard allows you to push the sight further forward on the rifle, but comes at the cost of rigidity and the reliability of your zero. For rifles with an extremely strong handguard—such as Daniel Defense’s near-legendary RIS rail system—the loss of rigidity and security is mild enough that it is hardly a concern. Offset dots are seldom used at range anyway, so minor variations in point of impact relative to point of aim are unlikely to be noticed or affect performance.
Rifles with more flexible ultralight handguards may be prone to more significant deviations, though, and so users with these types of handguards may be best served by a different mounting option. Ultimately, the choice of whether or not to mount a red dot forward on the handguard or rearward on the receiver will be decided by personal preference and space availability.

Conclusion
Mounting a red dot is not a complicated task, but as with many things, it can be hard to know what you don’t know, especially if you haven’t read our article on Five Things to Know Before When Buying a Red Dot. Because the process is so simple, it’s easy to assume that you know what you are doing and end up with a suboptimal result.
To properly mount a red dot on your AR-15, situate it as far forward as possible on the receiver without overlapping your handguard. By following that simple guidance, you’ll set yourself up for a secure attachment and optimal performance.