In most cases, zeroing your rifle is not a difficult task. It can be tedious at times, but as long as your rifle and optic are functioning properly, it’s not usually very challenging.
But, that can change if you don’t have access to a range for target shooting at an appropriate distance. Many optics and iron sights specify a zero distance of a hundred yards or more, which might seem impossible if your local range only goes out to 25 yards.
Luckily, we have a solution for you. It’s a bit more involved than the standard zeroing process but will allow you to zero your optic for any distance, at any range.

Why Should You Zero at 100 Yards?
We chose a 100-yard zero for our example because it’s one of the most common, but this same process should work for nearly any zero distance.
A 100-yard zero is a common choice for magnified optics, prisms, and red dots. It’s often the zero distance required to make a BDC line up correctly. In the case of most LPVOs, it’s also usually the distance at which the parallax is fixed.
What Scope Magnification is Good for Zeroing at 100 Yards?
Even in higher-powered rifle scopes designed for long-range shooting, 100 yards is a very common zero. With a shorter zero distance, such as 25 or 50 yards, you may find that you have to hold under the target at distances between 100 and 200 yards, then hold over or dial for range at targets beyond that.
With most common calibers, a 100-yard zero ensures that your point of impact will be at or below your point of aim at all distances, so you don’t have to remember whether to hold under or hold over—every shot at every distance will require a hold over, or no hold at all. Many marksmen appreciate the simplicity of this approach.

Pre-Zeroing Preparation
The basic premise behind this method is zero your rifle so that your point of impact is higher than your point of aim at the distance you have available to you. For our example, we’ll assume 25 yards. If done correctly, you’re point of aim should then match your point of impact at 100 yards, or whatever your desired zero distance is.
You might find a simplified version of these instructions online that recommend your point of impact be some generic number, usually 1.5 or 2 inches, above your point of aim.
How Different Ammunition Affects Your Zero
While those numbers are accurate for some rifles, they assume that you’re shooting a common caliber, such as a .308 Winchester or .223 Remington, with a common load, from a common barrel length. If your combination of firearm and load deviate from the norm in any way, you may find your bullets impact few inches or more over or under your point of aim when shooting at your desired zero distance.
Tools That Take the Guess Work Out of the Initial Sighting-In
Before heading to the range, you’ll need to determine the actual ballistic profile that’s appropriate for your rifle. To do that, you’ll need a ballistic calculator.
These algorithms take much of the guesswork out of determining your bullet’s flight path. Some are better than others, but all should be good enough to get you close to zero out to a few hundred yards, at least.
Premium versions like the Applied Ballistics calculator are used by top marksmen across the country, and even built into weather meters like the Kestrel 5700 Elite, but free ballistic calculators are available from several ammunition manufacturers as well, such as Hornady and Federal.
Regardless of which calculator you choose, the algorithm is only ever as good as the information you put into it. Try to be as precise as possible when entering data. Information like ballistic coefficient and projectile weight should be available from the manufacturer.
Muzzle Velocity is Another Factor When Zeroing Your Rifle
Muzzle velocity can be more difficult to determine since manufacturers do not always state what barrel length they use when measuring muzzle velocity. Additionally, muzzle velocity can vary slightly between firearms even when the barrel length remains constant.
The best way to determine your muzzle velocity is of course a chronograph, but if you don’t have one available, you can also try contacting the ammunition manufacturer to see if they have velocity information available for your barrel length or searching the internet to see if anyone has published velocity information for your cartridge and firearm combination.
How You Mount Your Rifle Scope Can Also Affect Zero
Set your zero distance to your desired zero, and your intervals to 25 yards. You’ll need to enter your height over bore, as well, which contrary to the common misconception is not the same as the height of your scope mount.
To determine your height over bore, take a tape measure or other measuring tool and measure the distance from the center of your barrel to the center of your optic. Be as precise as possible—this measurement has a significant effect on the accuracy of the calculator.
Of course, if you’re using a common rifle like an AR-15, a tape measure might be unnecessary. The flat top rail on a standard AR-15 is 1.215 inches over the bore, so if you know the height of your optic mount, you can just add those two numbers together.
Not only does the height over bore matter, but you need to be sure your scope reticle is level. If your scope is canted even the slightest, it will result in missed shots down range.
Other Tips for A Successful Zeroing Experience
Environmental variables are important to know if you intended to ever use your rifle for long range shots. Your ballistic calculator will use the atmospheric data when calculating shots at longer distances in different conditions. It is important to take these conditions into account once you are zeroed and shooting at extended ranges.
Lastly, if your calculator gives an option for the resulting chart to be labeled in MOA, MRAD, or inches, select inches.
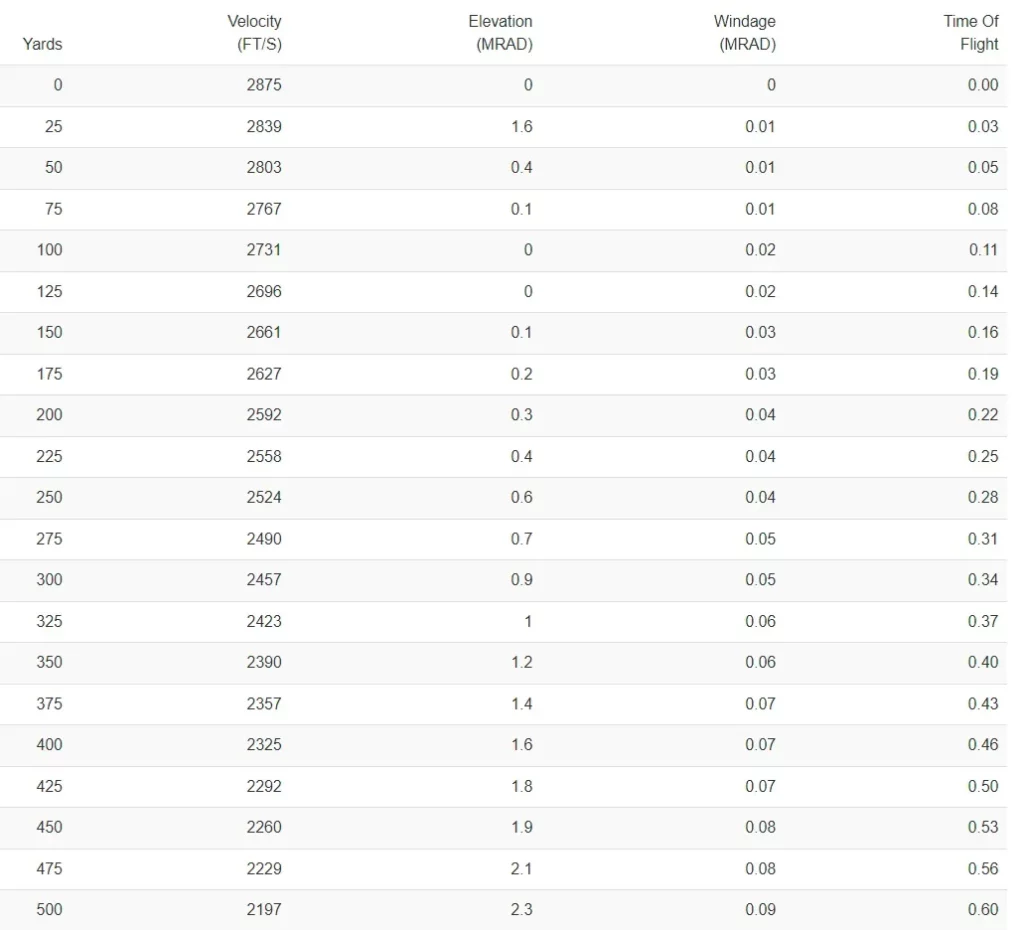
Your ballistic calculator will then provide you with a table of your bullet’s projected flight path, and sometimes a graph as well, which you can ignore for this task.

On the chart, find the row showing the point of impact at 25 yards (or whatever length your range offers) and record the drop or rise listed for that distance. If the number is positive, then the bullet will be striking above your crosshairs at 25 yards. If it’s negative, then it will strike below. Using the above chart, we can see that for our example, our bullet will strike 0.7 inches low at 25 yards, if we’re zeroed at 100.

The Zeroing Process
Armed with that information, it’s time to hit the range. This part of the process is much the same as any normal zeroing procedure. Set up your rifle in a stable position, ideally with sandbags or a shooting rest. Set your optic to its maximum magnification, if possible, and fire a three-round test group.
Normally, at this point, you would adjust your windage and elevation so that your point of aim matched your point of impact. But, that would give us a 25-yard yard zero, and we want a 100-yard zero. So instead, adjust your optic so that your point of aim is below or above your point of impact, according to the number you recorded earlier—in our case, 0.7 inches.
Since we’re working off a projected flight path rather than an actual one, there may be some variance in the actual point of impact at 100 yards. It’s usually minor, and not enough to change a shot that would have been a hit otherwise into a miss. But, if you’ll be using your firearm for hunting or self-defensive purposes, you should confirm your zero at 100 yards (or your desired distance) before relying on your rifle.
If you want a deeper dive into the zeroing process, check out this full write-up here.
Wrap Up
Using this method, you can zero any rifle for any distance, no matter what range happens to be available to you. It’s always a good idea to fire a few confirmation shots to make sure your ballistic calculator was accurate, but you can rest assured that you’ll be on the paper, and usually within an inch of the bullseye.


